Based on the diagram above, you have several options for adding new screens.

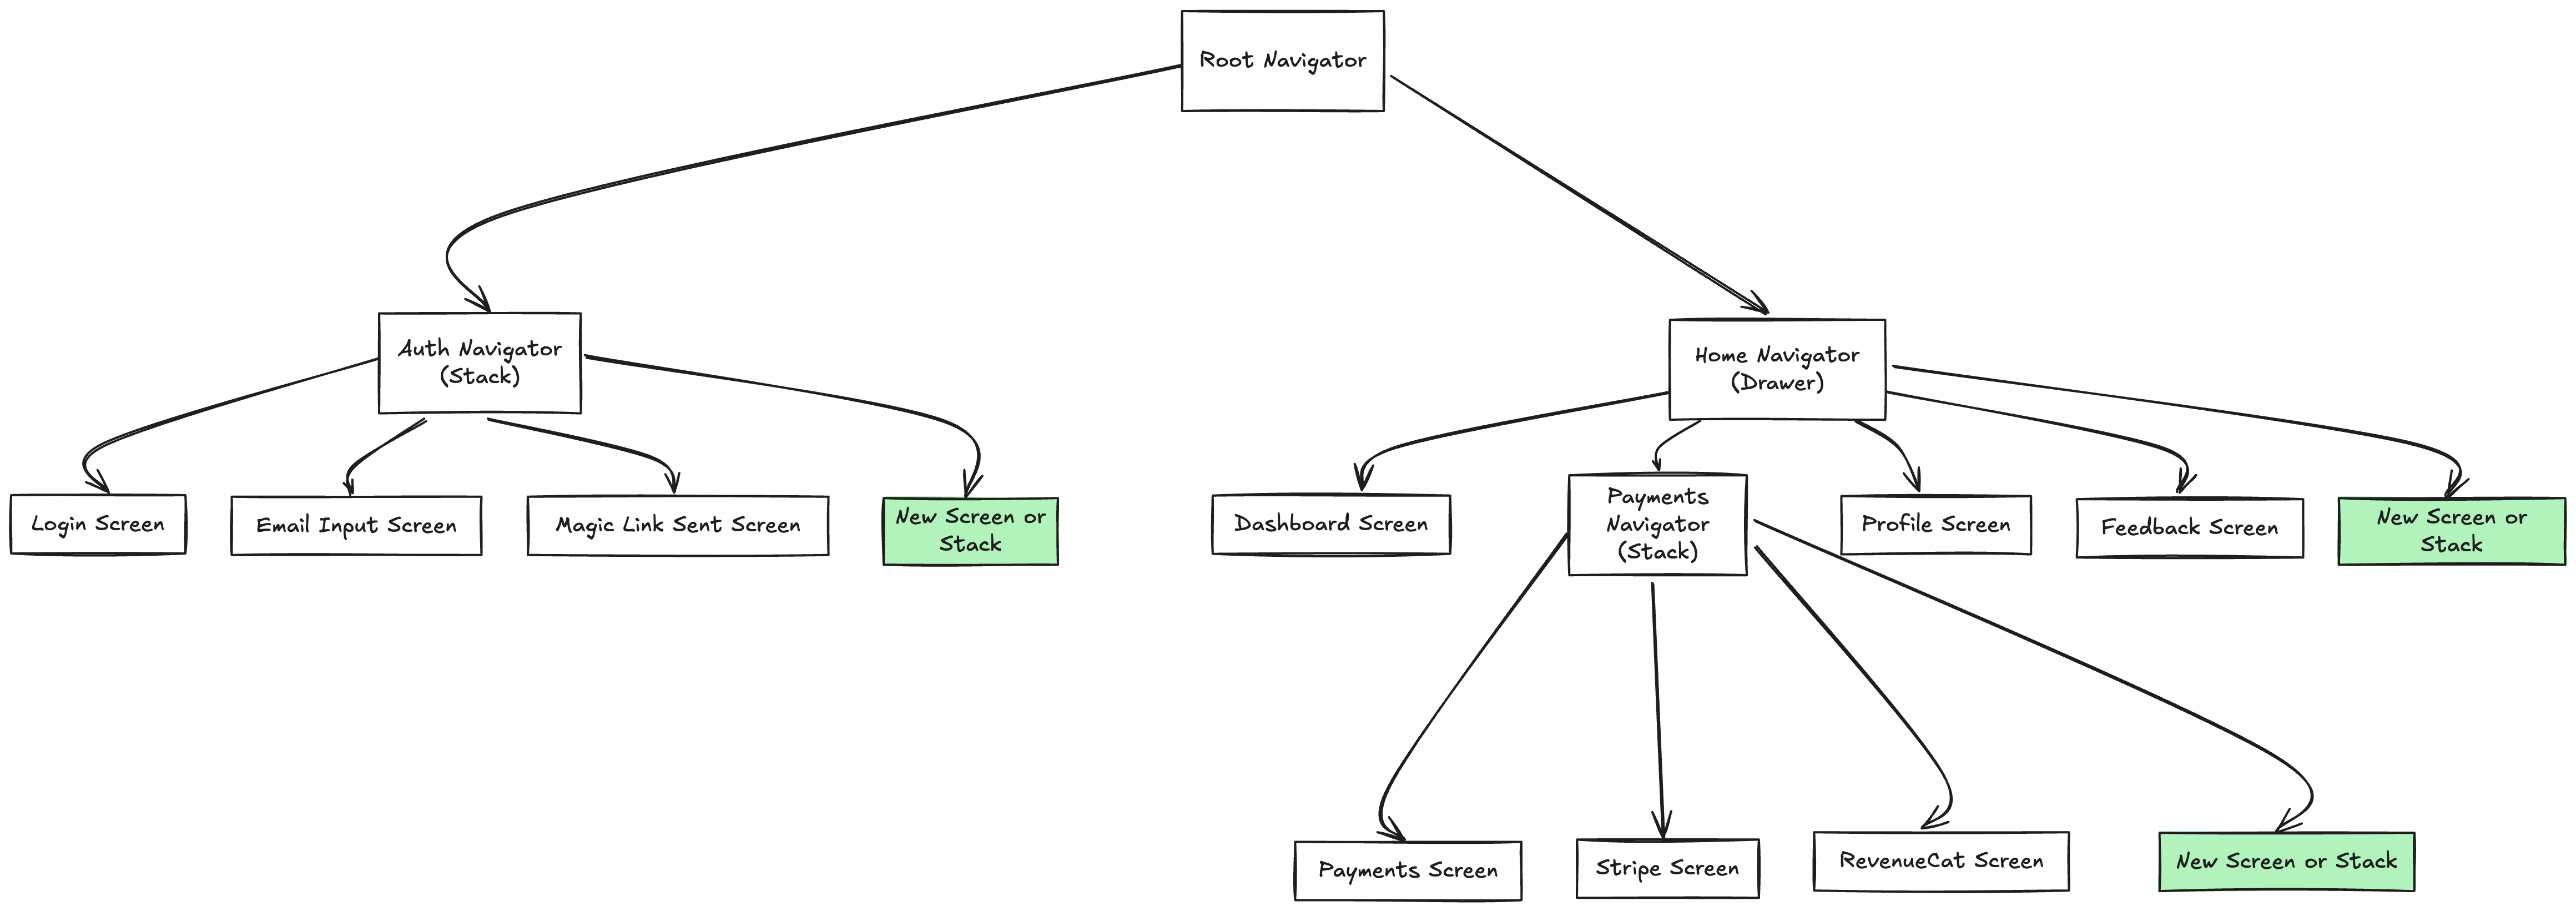
Auth Navigator (Stack)

As highlighted in the diagram, adding a new screen or stack to the Auth Navigator is useful for authentication-related features. Common use cases include:

  • Additional authentication methods (social logins, biometric auth, etc.)
  • Multi-step registration flows
  • Password reset/recovery flows
  • Pre-authentication onboarding screens
  • Post-authentication setup screens
  • Account verification flows

The Auth Navigator uses stack navigation, which is ideal for linear, step-by-step flows where users need to complete actions in sequence before accessing the main app. Here is an example of how to add a new screen to the Auth Navigator:

const AuthNavigator = () => {
  return (
    <Stack.Navigator screenOptions={{ headerShown: false }}>
      <Stack.Screen name="Login" component={LoginScreen} />
      <Stack.Screen name="EmailInput" component={EmailInputScreen} />
      <Stack.Screen name="MagicLinkSent" component={MagicLinkSentScreen} />
      <Stack.Screen name="YourNewScreen" component={YourNewScreen} />
    </Stack.Navigator>
  );
};

You would then navigate to the new screen using the navigate function:

navigation.navigate("YourNewScreen");

Home Navigator (Drawer)

The Home Navigator uses drawer navigation, which is ideal for organizing and categorizing screens into logical groups. Adding a new screen to the Home Navigator is useful for adding new features that are accessible from the main drawer. Common use cases include:

  • Access to features within the app that require an authenticated user (e.g. profile, settings, dashboard)
  • Additional account management screens (e.g. account details, preferences, billing)
  • Additional help and support screens (e.g. FAQs, contact support, documentation)
  • Analytics and reporting screens
  • Feature-specific screens that don’t require their own navigator

Here is an example of how to add a new screen to the Home Navigator:

const HomeNavigator = () => {
  const drawerOptions = [
    {
      icon: "your-icon",
      title: "Your New Screen",
      screen: "YourNewScreen",
    },
  ];

  return (
    <DrawerContentScrollView>
      <Drawer.Navigator drawerContent={(props) => <DrawerContent {...props} />}>
        <Drawer.Screen name="YourNewScreen" component={YourNewScreen} />
      </Drawer.Navigator>
    </DrawerContentScrollView>
  );
};

Adding a Screen to Home Navigator (Drawer)

Here’s a simple example of how to add a new screen to the drawer navigation:

  1. Create your new screen component:
// screens/Settings.tsx
import React from "react";
import { View, Text } from "react-native";

const SettingsScreen = () => {
  return (
    <View>
      <Text>Settings Screen</Text>
    </View>
  );
};

export default SettingsScreen;
  1. Add the screen to your drawer navigator:
const HomeNavigator = () => {
  return (
    <Drawer.Navigator
      drawerContent={(props) => <CustomDrawerContent {...props} />}
    >
      <Drawer.Screen name="Dashboard" component={DashboardScreen} />
      <Drawer.Screen name="Payments" component={PaymentsNavigator} />
      {/* Add your new screen here */}
      <Drawer.Screen name="Settings" component={SettingsScreen} />
    </Drawer.Navigator>
  );
};
  1. Add the screen to your drawer menu by updating the drawerOptions array in CustomDrawerContent:
const CustomDrawerContent = (props) => {
  const drawerOptions = [
    { icon: "home-outline", title: "Home", screen: "Dashboard" },
    { icon: "card-outline", title: "Payments", screen: "Payments" },
    // Add your new screen to see it in the drawer menu
    { icon: "settings-outline", title: "Settings", screen: "Settings" },
  ];

  return (
    <DrawerContentScrollView {...props}>
      {drawerOptions.map((option) => (
        <TouchableOpacity
          key={option.screen}
          onPress={() => props.navigation.navigate(option.screen)}
        >
          <Icon name={option.icon} />
          <Text>{option.title}</Text>
        </TouchableOpacity>
      ))}
    </DrawerContentScrollView>
  );
};

The drawerOptions array controls what appears in your drawer menu. Each object in the array needs:

  • icon: The icon to display (using react-native-vector-icons)
  • title: The text to show in the menu
  • screen: The screen name to navigate to (must match a Drawer.Screen name)

Your new screen will now appear in the drawer menu and be accessible through drawer navigation.